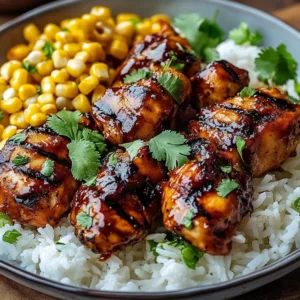
I still make this Sticky Garlic Chicken Noodles when I want something cozy, fast, and a little sticky-sweet that the whole family asks for again. Bite-sized chicken tossed in a honey-soy garlic glaze clings to tender noodles for an easy weeknight dinner that feels special without a lot of work. If you prefer a crispier finish on the chicken, I sometimes contrast this version with a fry-and-toss method like in crispy garlic chicken noodles when I want extra texture.
Why you’ll love this dish
Sticky, savory, and simple to pull together, this recipe hits a sweet spot between takeout and homemade. It’s quick enough for weeknights, wallet-friendly, and easy to scale up for a crowd. The honey balances the soy and garlic, while cornstarch gives the chicken a glossy, clingy coating so every noodle gets sauced. Use breasts if you want a leaner meal or thighs for juicier results.
"A perfect weeknight rescue: bold garlic, glossy sauce, and noodles that soak up every drop."
Step-by-step overview
Quick preview so you know what to expect. Mix a savory-honey sauce, toss chicken with cornstarch, brown the pieces in a hot skillet, then add the sauce to thicken. Meanwhile, cook the noodles and fold them into the skillet so they absorb the glaze. Finish with green onions and sesame seeds.
What you’ll need
- 1 lb chicken breast or thighs, cut into bite-sized pieces (thighs = more forgiving, breasts = leaner)
- 1/4 cup soy sauce
- 3 tbsp honey
- 4 garlic cloves, minced
- 1 tsp grated ginger (fresh preferred)
- 1/2 tsp red chili flakes (optional for heat)
- 2 tbsp cornstarch
- 2 tbsp vegetable oil (or other neutral oil)
- 8 oz noodles (rice noodles or egg noodles; see notes below)
- 2 green onions, chopped
- 1 tsp sesame seeds (optional for garnish)
Ingredient notes: If you need gluten-free, use tamari in place of soy sauce and rice noodles. For a lower-sugar option, reduce the honey to 2 tbsp and add a splash of rice vinegar for balance.
Step-by-step instructions
- Whisk the sauce: In a bowl combine soy sauce, honey, minced garlic, grated ginger, and red chili flakes if using. Set aside.
- Coat the chicken: Toss the chicken pieces with cornstarch until they are evenly coated. Shake off any excess.
- Brown the chicken: Heat the vegetable oil in a large skillet over medium-high. Add chicken in a single layer, giving pieces room so they brown. Cook 6 to 8 minutes, turning so all sides get golden and the chicken reaches 165°F (74°C).
- Add the sauce: Pour the prepared sauce over the browned chicken. Stir and let it simmer 2 to 3 minutes until it thickens and becomes glossy. If you want a thicker glaze, mix 1 tsp cornstarch with 2 tbsp cold water and stir in, cooking another minute.
- Cook the noodles: Meanwhile, prepare the noodles according to package instructions. Drain and, for rice noodles, rinse briefly under warm water if the package recommends it. Toss with a drop of oil to prevent sticking.
- Combine: Add the cooked noodles to the skillet. Toss gently so the noodles pick up the sauce and the chicken is evenly distributed. Warm through for a minute.
- Finish and serve: Plate the noodles and top with chopped green onions and a sprinkle of sesame seeds.

Directions to follow
Follow these actions for best results. Prep the sauce and chicken first so the skillet stage moves quickly. Keep heat high enough to brown but not burn the honey. Work in batches if needed so the pan stays hot and the chicken crisps.
How to plate and pair
Serve this in wide shallow bowls so the noodles spread and the sauce shows. Brighten each portion with extra green onions or a squeeze of lime for tang. Pairings: a simple cucumber salad, steamed broccoli, or quick stir-fried snap peas cut through the sweetness. For a richer family-style night, serve with extra toasted sesame seeds and chili oil on the side.
For a creamier weeknight option that leans into garlic and comfort, consider trying creamy chicken garlic Parmesan pasta another one of my go-to dinners.
Storage and reheating tips
- Refrigerate within two hours in an airtight container. Eat within 3 to 4 days.
- Reheat on the stovetop over medium-low, adding a splash of water or chicken stock to loosen the sauce and heat through to 165°F (74°C). Microwaving works; stir halfway to reheat evenly.
- Freezing noodles usually ruins the texture. If you must freeze, separate the chicken and sauce from the noodles. Freeze the chicken and sauce up to 2 months in a sealed container. Thaw overnight and reheat gently on the stove, then toss with freshly cooked noodles.
Pro chef tips
- Cornstarch is doing two jobs: it gives the chicken a crisp, dry coating and helps the sauce cling. Make sure the chicken surface is mostly dry before you coat it.
- Don’t overcrowd the pan. Browning happens only with air around each piece. Work in batches if your skillet isn’t large.
- Use fresh grated ginger and freshly minced garlic for the best aroma. Garlic burns quickly; add it to the sauce or toward the end of browning to avoid bitterness.
- Test doneness with a kitchen thermometer rather than time alone. Chicken should reach 165°F (74°C).
- If the sauce becomes too thick, loosen with 1 to 2 tablespoons of water or stock rather than more oil.
Creative twists
- Veg-forward: Add quick-cooking veg like bell pepper strips, shredded carrots, or snap peas when you add the sauce so they stay crisp-tender.
- Swap the protein: Use pressed and cubed firm tofu tossed with cornstarch and pan-fried for a vegetarian version.
- Spicy-sweet: Double the chili flakes and add a teaspoon of sambal oelek for real heat.
- Nutty finish: Stir in a tablespoon of tahini or peanut butter for an Asian-satay inspired glaze.
- Noodle swaps: Try soba for a buckwheat note or rice vermicelli for a lighter mouthfeel.
Common questions
Can I use chicken thighs instead of breasts?
Yes. Thighs are more forgiving and stay juicy during high-heat cooking. Trim excess fat, then cut into similar-sized pieces so they cook evenly.
How long does this recipe take from start to finish?
Active time is about 20 to 30 minutes. Prep (cutting chicken and mixing sauce) is 5 to 10 minutes. Browning and combining takes another 10 to 15 minutes.
Can I make this ahead for meal prep?
You can cook the dish and refrigerate up to 3 days. For best texture, store the sauce and chicken separately from the noodles and reheat on the stove before combining with freshly cooked or reheated noodles.
My sauce is too thin or too thick. How do I fix it?
If too thin, make a cornstarch slurry: 1 tsp cornstarch mixed with 2 tbsp cold water, then stir into the simmering sauce until glossy. If too thick, add a tablespoon of warm water or stock at a time until you reach the desired consistency.
What noodles work best?
Egg noodles give a chewy, satisfying bite and hold sauce well. Rice noodles are lighter and soak up the glaze quickly. Choose based on preference; adjust cooking time per package instructions.

Sticky Garlic Chicken Noodles
Ingredients
Method
- Whisk the sauce: In a bowl combine soy sauce, honey, minced garlic, grated ginger, and red chili flakes if using. Set aside.
- Coat the chicken: Toss the chicken pieces with cornstarch until they are evenly coated. Shake off any excess.
- Brown the chicken: Heat the vegetable oil in a large skillet over medium-high. Add chicken in a single layer, giving pieces room to brown. Cook for 6 to 8 minutes, turning to ensure all sides get golden and the chicken reaches 165°F (74°C).
- Add the sauce: Pour the prepared sauce over the browned chicken. Stir and let it simmer for 2 to 3 minutes until thickened and glossy. For a thicker glaze, mix 1 tsp cornstarch with 2 tbsp cold water and stir in, cooking for another minute.
- Cook the noodles: Meanwhile, prepare the noodles according to package instructions. Drain and rinse briefly under warm water for rice noodles if the package recommends it. Toss with a drop of oil to prevent sticking.
- Combine: Add the cooked noodles to the skillet. Toss gently so the noodles pick up the sauce and the chicken is evenly distributed. Warm through for a minute.
- Plate the noodles and top with chopped green onions and a sprinkle of sesame seeds.