I still remember the first time I made this Cherry Cheesecake Dump Cake: I expected something quick and messy, but what came out of the oven was a perfectly balanced, custardy center with bright cherry pockets and a crisp, buttery topping. This is the kind of dessert you bring to a potluck when you want something impressive without fuss. If you enjoy bold fruit-and-cream desserts, you might also like the richer, dramatic textures in the Blackberry Velvet Gothic Cake, which plays with similar contrasts in flavor and texture.
What makes this recipe special
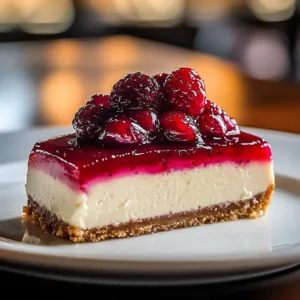
This dump cake blends the tangy cream-cheese layer with jarred cherry pie filling and a dry cake mix that crisps into a streusel-like top when buttered and baked. It’s fast to assemble, forgiving for beginners, and scales easily for crowds. Make it for a casual weeknight dessert, a summer BBQ, or a cozy Sunday brunch—any time you want a dessert that looks homemade without hours of work.
"Simple to assemble, wildly addictive: the fluffy cream-cheese ribbon against jammy cherries is comfort food done right."
Preparing Cherry Cheesecake Dump Cake
Quick overview so you know what to expect: soften the cream cheese, spread the cherry filling in the pan, drop and smooth the cream-cheese batter, cover with dry cake mix, drizzle with melted butter, add pecans and cinnamon if you like, then bake until golden and set. The time investment is mostly passive—about 10 to 15 minutes to assemble and 40–45 minutes in the oven.
Key ingredients
- 1 can (21 oz) cherry pie filling
- 1 package (8 oz) cream cheese, softened to room temperature
- 1/2 cup granulated sugar
- 1 teaspoon vanilla extract
- 1 box (15.25 oz) yellow cake mix, dry and unprepared
- 1/2 cup unsalted butter, melted
- 1/2 cup chopped pecans (optional)
- 1 teaspoon ground cinnamon
Notes and substitutions:
- Cream cheese: full-fat gives the best texture; low-fat versions can be used but may be less rich.
- Cake mix: swap for gluten-free yellow cake mix if needed.
- Nuts: omit to keep it nut-free, or use walnuts instead of pecans.
- Cherry filling: feel free to use another fruit pie filling such as blueberry or mixed berry for a different flavor.
Step-by-step instructions
- Preheat the oven to 350°F (175°C). Grease a 9×13-inch baking dish.
- In a medium bowl, beat the softened cream cheese with the sugar and vanilla until smooth and creamy.
- Spread the cherry pie filling in an even layer across the bottom of the prepared dish.
- Dollop the cream-cheese mixture over the cherries, then gently spread into an even layer without mixing down into the fruit.
- Sprinkle the dry yellow cake mix evenly over the cream-cheese layer. Try to cover as uniformly as possible.
- Drizzle the melted butter over the cake mix, aiming for even coverage so the topping browns consistently.
- If using, scatter the chopped pecans on top and dust with the ground cinnamon.
- Bake for 40 to 45 minutes, until the top is golden brown and the center is set (it should jiggle only slightly).
- Let the cake cool for 15 to 20 minutes before serving so the layers set and slices hold together.

Best ways to enjoy it
Serve warm with a scoop of vanilla ice cream or a dollop of whipped cream to echo the cheesecake-like richness. For a brunch twist, cut squares and pair with a strong coffee or a milky latte. To make slices look fancier, garnish with a few fresh cherries or a light dusting of confectioners’ sugar right before serving.
Storage and reheating tips
Refrigeration: Store leftovers covered tightly with plastic wrap or in an airtight container in the refrigerator for 3 to 4 days. Because of the cream cheese, keep it refrigerated whenever not serving.
Freezing: For longer storage, wrap individual slices in plastic wrap and place in a freezer-safe container or bag. Freeze up to 2 months. Thaw overnight in the refrigerator.
Reheating: Warm slices in the microwave for 20–30 seconds, or reheat in a 300°F (150°C) oven for 8–12 minutes until warm. Avoid overheating to prevent drying out.
Food safety: Do not leave cream-cheese–based desserts at room temperature for more than two hours.
Pro chef tips
- Bring the cream cheese to true room temperature for a smooth, lump-free mixture. Cold cream cheese makes uneven dollops that are harder to spread.
- Use an offset spatula or the back of a spoon to gently spread the cream-cheese layer; be gentle so you keep the distinct layers.
- Melt the butter completely and drizzle slowly. If you pour it all in one spot, the topping can pool and bake unevenly.
- If the top browns too fast, tent loosely with foil for the last 10 minutes of baking.
- For a crisper topping, use a metal baking dish; glass holds heat and will result in a softer edge.
Flavor swaps
- Berry version: substitute cherry filling with blueberry or mixed berry pie filling for a brighter, slightly tarter profile.
- Cinnamon streusel: replace the pecans with a simple streusel made from 1/2 cup flour, 1/4 cup brown sugar, 1/4 cup butter, and 1/2 teaspoon cinnamon; sprinkle that on top before baking.
- Dairy-free option: use dairy-free cream cheese and a plant-based butter alternative—textures will vary but flavor remains pleasant.
- Caramel twist: after baking, drizzle a little caramel sauce over warm slices for a sweet finish; for more apple-forward desserts, see how similar recipes like Caramel Apple Cheesecake Bars layer flavors and textures.
Common questions
How long does this take from start to finish?
Hands-on assembly takes about 10–15 minutes. Baking is 40–45 minutes and cooling 15–20 minutes, so plan on about 1 hour to 1 hour and 20 minutes total.
Can I use fresh cherries instead of canned pie filling?
Yes, but cook them first into a quick compote with sugar and a splash of lemon juice until slightly thickened. Fresh cherries release more water, so simmering concentrates flavors and prevents a watery bottom layer.
Can I make this ahead of time?
You can assemble the cake up to the point of baking and refrigerate it for a few hours before baking—cover tightly. Baked cake can be made a day ahead and refrigerated; warm gently before serving.
Is this recipe freezer-friendly?
Yes. Wrap cooled slices tightly in plastic wrap and place in a freezer-safe bag or container for up to 2 months. Thaw overnight in the refrigerator before reheating.
My top layer got soggy. How can I prevent that?
Evenly distribute the melted butter and avoid oversoaking the cake mix. Using a metal pan helps create crisper edges, and a light tenting with foil during the final minutes will slow browning without trapping moisture.

Cherry Cheesecake Dump Cake
Ingredients
Method
- Preheat the oven to 350°F (175°C). Grease a 9x13-inch baking dish.
- In a medium bowl, beat the softened cream cheese with the sugar and vanilla until smooth and creamy.
- Spread the cherry pie filling in an even layer across the bottom of the prepared dish.
- Dollop the cream-cheese mixture over the cherries, then gently spread into an even layer without mixing down into the fruit.
- Sprinkle the dry yellow cake mix evenly over the cream-cheese layer.
- Drizzle the melted butter over the cake mix for even coverage.
- If using, scatter the chopped pecans on top and dust with the ground cinnamon.
- Bake for 40 to 45 minutes, until the top is golden brown and the center is set.
- Let the cake cool for 15 to 20 minutes before serving.