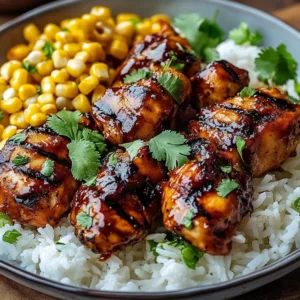
I still remember the first time I wrapped one of these up: the crunch of the golden exterior, the molten cheese tug as I bit in, and the smoky chipotle nudging the seasoned beef. A grilled cheese burrito takes the comfort of a classic melt and turns it into a handheld feast. It’s quick, satisfying, and perfect for nights when you want something sharable, messy, and utterly comforting. If you enjoy rich, creamy fillings in handheld form, you might also like this other savory twist on comfort food: cream cheese chicken.
Why you’ll love this dish
This grilled cheese burrito blends familiar elements—seasoned beef, rice, and two melting cheeses—into one portable, flavor-packed package. It’s great for weeknight dinners, casual gatherings, or when kids and adults alike need a no-fuss meal. The nacho cheese gives smooth, saucy comfort while the cheddar and low-moisture mozzarella create that stretchy, grilled-cheese pull. Using rice stretches the beef so a little goes a long way, which keeps it budget-friendly.
“Family crowd-pleaser: easy to double, quick to make, and never any leftovers.” — home cook review
Why it works: the combo of saucy and solid textures prevents sogginess, the warmed tortilla folds without tearing, and pan-grilling the seam on a cheesy bed seals everything and gives a crisp shell.
Preparing Grilled Cheese Burrito
Step-by-step overview
- Brown and season the ground beef so it’s flavorful and not greasy.
- Warm tortillas and assemble with rice, sauces, and cheese.
- Roll tightly, then pan-grill the burritos on a thin layer of cheese to get a golden, crisp exterior and sealed seam.
This recipe moves fast. Plan for about 25 to 30 minutes total: 10 minutes to cook beef, a few minutes to assemble, and about 6 to 8 minutes to grill both sides.
What you’ll need
- 1 lb ground beef
- 1 packet taco seasoning or an equal homemade blend (1 tsp cumin, 1 tsp chili powder, 1/2 tsp paprika, 1/2 tsp garlic powder, 1/2 tsp onion powder, 1 tsp salt)
- 1 cup cooked white rice (day-old rice holds up best)
- 1/2 cup sour cream
- 1/2 cup nacho cheese sauce, warmed slightly for spreadability (microwave 10–15 seconds)
- 1/4 cup chipotle sauce
- 1 cup shredded cheddar cheese
- 1 cup shredded mozzarella cheese, low-moisture recommended
- 4 large flour tortillas
- Butter or neutral oil for grilling
Substitutions and notes: swap ground beef for ground turkey or shredded rotisserie chicken in a pinch. If you prefer less heat, reduce the chipotle sauce or replace it with mild salsa. Day-old rice is drier and keeps the burrito from getting soggy.
How to prepare it
Directions to follow
- Heat a skillet over medium heat. Add the ground beef and break it into small pieces. Cook 8 to 10 minutes, stirring occasionally, until there’s no pink.
- Carefully drain excess grease, then return the skillet to medium. Sprinkle in the taco seasoning and add 1/4 cup water. Stir and simmer 3 to 5 minutes until the mixture thickens and coats the beef.
- Warm the tortillas briefly in a skillet or the microwave for 10 to 15 seconds. They will be more pliable and easier to roll.
- Lay a warmed tortilla flat. Spoon 1/4 cup cooked rice into the center. Add a generous portion of the seasoned beef. Drizzle with nacho cheese and chipotle sauce. Dot with sour cream. Sprinkle a little cheddar and mozzarella over the top.
- Fold the short sides inward, then roll the tortilla tightly to form a burrito. Tuck the seam under to seal.
- Wipe the skillet clean and return it to medium heat. Sprinkle about 2 tablespoons of shredded cheese in the skillet. Place the burrito seam-side down onto that cheese patch. Press lightly with a spatula and cook 3 to 4 minutes, until the bottom is golden and the cheese is crisp. Flip and cook the other side for 3 to 4 minutes.
- Transfer to a cutting board and rest 1 minute before slicing so the filling sets.

Best ways to enjoy it
Serving suggestions
Cut each burrito in half and serve on a platter for dipping. Offer extra chipotle sauce, a side of pico de gallo, and lime wedges for brightness. For a Tex-Mex spread, add cilantro-lime slaw or Mexican street corn salad. If you want a sweet finish, pair the meal with a light dessert such as decadent apple crisp cheesecake.
Keeping leftovers fresh
How to store & freeze
- Refrigerator: Cool burritos to room temperature, wrap individually in foil or airtight containers, and refrigerate for up to 3 days.
- Freezer: Wrap tightly in plastic wrap and foil, label, and freeze for up to 2 months. Thaw overnight in the refrigerator before reheating.
Reheating tips: Reheat in a 350°F oven for 12 to 15 minutes from refrigerated, or 20 to 25 minutes from frozen (unwrapped for frozen after partial thaw), flipping once. For a crisp exterior finish, finish in a hot skillet or air fryer for 2 to 3 minutes per side. Always reheat until internal temperature reaches 165°F for safety.
Pro chef tips
- Use low-moisture mozzarella for stretch without excess water. Fresh mozzarella will add moisture and can make the burrito soggy.
- Warm the tortilla but avoid overheating; a too-hot tortilla can become brittle and crack when folded.
- Dry your rice slightly by spreading it on a tray for a few minutes; that prevents excess steam inside the burrito.
- Press the seam-side down into the skillet and hold for a few seconds to ensure a tight seal before you start browning.
- If you want crispier edges, add just a light brush of butter to the skillet rather than a lot of oil.
Creative twists
- Vegetarian: Replace beef with seasoned black beans and roasted sweet potato. Add a squeeze of lime and cilantro.
- Breakfast: Scramble eggs and swap rice for tater tots. Add breakfast sausage alternative and pepper jack cheese.
- Smoky green: Use salsa verde and smoked gouda with shredded chicken and cilantro.
- Extra crunch: Add thinly sliced fried onions or crispy tortilla strips inside for texture.
- Lower-carb: Use a large low-carb or high-fiber tortilla and skip the rice, adding extra veggies.
Common questions
How long does this take to make?
Active cook time is about 20 to 25 minutes. Including prep and a quick cool/rest, plan 30 minutes from start to finish.
Can I make these ahead for a party?
Yes. Assemble and wrap burritos, then refrigerate for up to a day. Reheat in the oven or skillet before serving. For longer storage, freeze and reheat as needed.
Will the tortilla get soggy with the sauces?
Not if you follow a few rules: use slightly drier rice, don’t overfill with liquid sauces, and warm the tortilla so it seals well. Pan-grilling the burrito also produces a barrier and crisp exterior that limits sogginess.
Can I use different cheeses?
Absolutely. Cheddar and low-moisture mozzarella are chosen for flavor and stretch. Pepper jack adds heat. A melty Monterey Jack or a mild Colby also works well.
Is it safe to reheat more than once?
No. Reheat only the portion you plan to eat and keep leftovers refrigerated. Repeated reheating increases bacteria risk and degrades texture.

Grilled Cheese Burrito
Ingredients
Method
- Heat a skillet over medium heat. Add the ground beef and break it into small pieces. Cook 8 to 10 minutes, stirring occasionally, until there's no pink.
- Carefully drain excess grease, then return the skillet to medium. Sprinkle in the taco seasoning and add 1/4 cup water. Stir and simmer 3 to 5 minutes until the mixture thickens and coats the beef.
- Warm the tortillas briefly in a skillet or the microwave for 10 to 15 seconds. They will be more pliable and easier to roll.
- Lay a warmed tortilla flat. Spoon 1/4 cup cooked rice into the center. Add a generous portion of the seasoned beef. Drizzle with nacho cheese and chipotle sauce. Dot with sour cream. Sprinkle a little cheddar and mozzarella over the top.
- Fold the short sides inward, then roll the tortilla tightly to form a burrito. Tuck the seam under to seal.
- Wipe the skillet clean and return it to medium heat. Sprinkle about 2 tablespoons of shredded cheese in the skillet. Place the burrito seam-side down onto that cheese patch. Press lightly with a spatula and cook 3 to 4 minutes, until the bottom is golden and the cheese is crisp. Flip and cook the other side for 3 to 4 minutes.
- Transfer to a cutting board and rest 1 minute before slicing so the filling sets.